
|
|
| Elliott Sound Products | Project 259 |
The system described here is a 12V trigger extender that also uses a 4-stage sequencer, and it works both with power-up and power-down. In common with most commercial power sequencers, the last item to receive power is the first to be turned off when the sequencer is turned off. Sequencers are often used to ensure that any equipment that is likely to cause loud transients is turned on first, and before power amplifiers (for example), and likewise they are the last to be turned off, so the opportunity for nasty noises is minimised because the amps are off until everything has settled, and are turned off first so that they can't reproduce the switch-off transients caused by other equipment. This is a simplified version of the Project 144 mains power sequencer, but without the mains switching.
While the 12V trigger arrangement has been with us for quite some time, be aware that there is zero standardisation, other than (mostly!) the use of a mono 3.2mm (1/8") mini jack plug and socket, and it should always work with a 12V supply. Some equipment uses a 12V relay to turn on the power, other gear uses a sensor that detects an input voltage of (nominally) +12V, but may accept anything from 5V to 25V quite happily. Some equipment uses a transistor to switch an internal relay, but that requires an 'always-on' supply within the equipment. A few use an opto-coupler to perform the interface between the controlled and controlling gear, which has the advantage of isolating the systems to prevent ground loops, but that's easily done with a relay too.
In some cases you'll see people recommending a zero-crossing TRIAC trigger IC or a zero-crossing SSR (solid state relay). This is wrong if the gear has a 'conventional' transformer based power supply, and is only recommended if the gear uses a switchmode supply. In all other cases a random-triggering SSR (or TRIAC driver) should be used. In general, I do not recommend using SSRs to switch audio equipment.
For what it's worth, I'm fully aware that much of the basic circuitry could be eliminated by using a PIC or other microcontroller. However tempting this might seem, it also has certain risk factors. Should the PIC used go out of production there's nothing you can do if it fails. You literally end up with a box of bits and pieces that you can't use any more. A PIC would still need an interface circuit to convert from 5V to 12V, transistors to drive the outputs, and of course it still needs a power supply. You also need 'real world' protection for input circuits and the necessary code has to be written.
Compare that with a simple hardware design. In 20 years time, you'll still be able to fix it should something go wrong. The power supply is most easily fixed by replacement, and you might need to change the odd electrolytic cap that has lost capacitance. Other parts are so common and have been with us for so long that they are unlikely to go away any time soon. They are also cheap, but most can be expected to have an almost unlimited life. A PIC won't help you one bit if the output switching transistors fail, but you will be in serious difficulties if the PIC fails and you don't have a spare.
From the perspective of many DIY people, showing a design implemented in hardware also demonstrates general circuit principles and provides a great learning tool. Even if they don't build the project, just seeing how things can be done can provide valuable insight. You get very little of that while looking at the diagram of a PIC - a central inscrutable block with a few input and output lines. While PICs are wonderful tools, there are some things that really should be done with hardware - apart from anything else, it's a lot more fun.
A cost comparison between the two techniques would reveal that the PIC approach is cheaper, but probably not by very much. Only considering the sequencer and not the loss-of-AC detector, there are certainly savings to be made, but there are additional parts to be considered - the PIC alone can't do everything without help. It needs a 5V regulator, and suitable protection from the outside world is essential. Suffice to say that the hardware version exists here, and the PIC based version doesn't (and it's not likely either).
The sequencer is based on a series of opamp comparators, supplied with a linear ramp as a capacitor charges via a constant current source. While it is certainly possible to just charge a capacitor using a resistor, the resulting curve is exponential. This makes it harder to get equal timing between the units being powered up, and if power-up is made equal then power-down will be unequal. The linear ramp is easy to achieve, and for the small extra cost (a few cheap general purpose transistors) we get a far better overall result. A second current source (a current sink, actually) discharges the cap when the power sequence switch (local or remote) is turned off.
This means that the equipment is powered down with the opposite sequence as it was powered up. The design presented here uses a 4-stage sequence, with a nominal 1-8 second delay between each output becoming active (+12V). The outputs go low again in the reverse order, and the timing for both can be made faster or slower. The on and off sequences use equal timings. Note that D3 is to protect against reverse polarity, and it will short-circuit the power supply. All approved switchmode supplies will either current-limit or switch off when shorted, so nothing will be damaged.
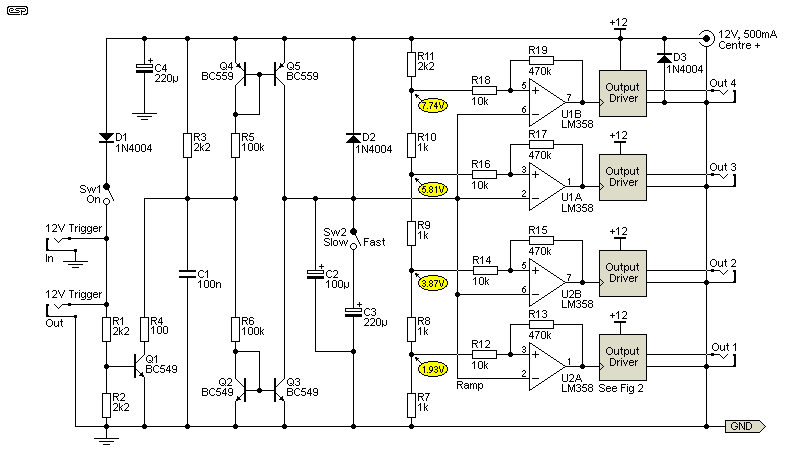
The schematic for the main circuit is shown in Fig. 1. Although transistors are shown as BC549/ BC559, you can use any small signal NPN and PNP transistors you have handy. The transistors are not critical, as they all operate at 12V maximum and a few milliamps at most. C2 should ideally be a low-leakage cap, rated at 25V to ensure that leakage does not cause malfunctions. This part of the circuit works as follows ...
- When the switch Sw1 is operated or +12V is applied to the 12V trigger input, the upper current source (a current mirror) is enabled, and C2 (and/ or C3) charges linearly until it reaches the maximum of a little under 12V. As the voltage exceeds each of the voltages shown at the comparator inputs, the respective comparator output goes low, which in turn switches on the appropriate output. The sequence time can be varied by switching C3 in or out. The values can be altered if you want different sequence timing.
- When the switch is turned off, the lower current mirror turns on (via R3), and discharges C2/C3. Again, as the voltage falls below the comparator's reference voltage, the respective comparator turns off again, sending the output high.
- All comparators have hysteresis (positive feedback) to ensure there is a clean switching signal with no unexpected on/off transitions that may cause equipment problems.
With the values shown, each output will go low at ~1.6 second intervals with Sw2 set to 'Fast', and ~5 second intervals with Sw2 set for 'Slow'. The time delays can be adjusted by selecting different capacitor values. Output #1 is also delayed to allow for cascading. By doing this, the last output of the first unit is used to trigger the second (etc.). With two units, this provides an eight stage sequence, with the last circuit turning on after 8 time delays. There is no limit to the number of units that can be cascaded, but it could make the power-up sequence far longer than desirable, and is highly unlikely to be required.
 | Note that cascaded units will be triggered to turn off when output #4 is de-energised, so the power-down sequence for cascaded
units is not the reverse of power-on! The power-down sequence for the second unit starts when the output #4 of the first unit is turned off, and not when output #1 switches off.
|
Increasing the value of C2/C3 extends the time - the maximum interval is around 5 seconds if Sw3 is closed. In general, there's little point providing very short or very long intervals, but long delays might be useful with some equipment that uses switchmode power supplies or for gear that insists on making loud noises shortly after power is applied.
Should power be interrupted, the unit will reset via D2 as the supply voltage collapses, and the preset sequence will be followed when power is restored. This ensures that your start-up sequence is preserved. Note that the reset is not instant - it may take a few seconds to ensure that the supply has returned to(near) zero.
Without a sequencer, if power is momentarily interrupted, when it returns all equipment is powered on simultaneously. If the load happens to be a stack of power amplifiers, the chance of the breaker not tripping is rather remote. Things that make noises will be heard making noises, speakers may be damaged, etc.
By default, this unit uses a 12V trigger signal, but an On/ Off switch is recommended (Sw1) for testing. It can even be used as the 'master' switch to turn on your other gear. When the switch is operated, the 12V trigger input and output are both energised via D1, so they can be used as outputs with Sw1 controlling everything. The output voltage is about 11.3V because of the diode, but that's enough for any sensibly designed 12V trigger.
The output switching is shown next. These switches are active low, so when the output goes low (close to zero volts) the output transistor turns on, supplying 12V to the corresponding output socket. Should there be a fault (typically a short circuit) at the output, the voltage across R3 exceeds 0.65V, turning on Q2 which reduces the base current available to Q1. The current is limited to about 70mA. With a typical (but close to worst case) output load of around 270Ω typical for a 10A relay, the output current is ~45mA, and the output voltage is 11.5V - more than enough to activate the relay. If you need more current, the value of R3 can be reduced, but I wouldn't use less than 6.8Ω (about 95mA short circuit current).
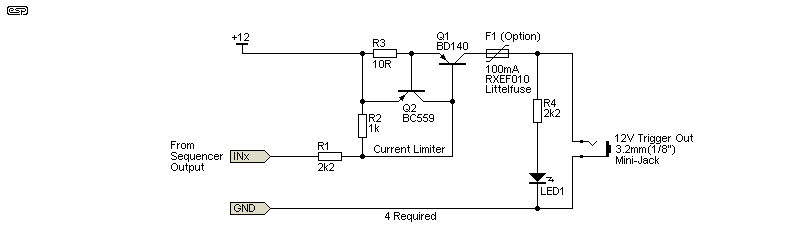
The current limiting (or PTC fuse) for the output switches is important. If you plug a 'live' (i.e. 12V present) plug into a remote piece of gear, by default jack plugs are almost always shorted as they are inserted. Without the current limiter or PTC fuse this will damage the output transistor. An electronic fuse could be used, but that's far more complex, so the limiters are a better proposition for a home system. It does add some complexity, but for the sake of a 10Ω resistor and a BC559 transistor that's a small price to pay. Do be aware that the current limiters are intended to protect against momentary faults. If the fault is present for any length of time, the switching transistor (BD140) will be damaged, as it will dissipate close to 1W so will get very hot. You can use a small heatsink if you think that sustained faults are likely.
You might prefer to use a Poly Switch rated for perhaps 100mA or so (e.g. Littelfuse RXEF010), and these should trip within ~25ms. Their internal resistance is (probably) enough to prevent damage, but they may cost more than the 10Ω resistor and BC559. If you use a Poly Switch, short R3 and omit Q2. The remaining two resistors are required! The advantage is that a heatsink for Q1 can be far smaller, because the peak power (around 3W) is present for a limited time. Be aware that it may take a few seconds for the Poly Switch to reset after an overload.
For those who don't know what a Poly Switch is, it's a PTC (positive temperature coefficient) thermistor. They are commonly used for tweeter overload protection in low-cost speaker systems, and when subjected to a current above their nominated holding current, they get hot and increase their resistance to limit the current. With a significant overload they are pretty fast, but they still rely on a body of resistance material to heat up, so they are never instantaneous. Poly Switches also degrade with usage over time, so they may eventually refuse to allow their rated current and will trip prematurely. This is unlikely to be an issue with this project, as it might never have an output shorted, or if it does, it will be infrequent.
I suggest that you use an external 12V switchmode power supply. These usually have a rather short hold-up time when loaded, so if there is a power interruption the DC voltage will fall to zero very quickly. As always though, this can't be guaranteed. The supply should be rated for at least 500mA, but (ideally) not more than 1A. With all outputs driven to their maximum current (about 70mA), the total is under 300mA. You could use an external (or internal) linear supply, but the linear PSU will be more expensive and take up far more space than a suitable 12V SMPS. However, it will also be more reliable, and this is an important consideration. Most of the current is drawn by the external relays, although these are not always used.
The most obvious PSU arrangement is an external plug-pack ('wall-wart') type, with a standard DC barrel connector on the sequencer. However, you may prefer to have the supply internal, and you will then need a mains input connector (or a fixed mains lead, generally a horrible option). A mains earth lead is only really needed if the unit has a metal chassis, or the supply cannot be relied upon to meet Class-II (double insulated) standards. To maintain Class-II, mains and low voltage wiring must be separated by at least 5mm, but preferably much more.
If you are building this project, I fully expect that you are not a beginner, and have good skills wiring opamps, transistors etc. on Veroboard or similar. All diodes throughout the circuit are 1N4148 or similar. Standard LEDs will be quite alright - they are all set up for a forward current of ~4mA, so are bright enough to be seen, but not obtrusive. High brightness types will (of course) be extremely bright with 4mA, and the series resistors can be increased from 2.2k to perhaps 10k - I leave that to the constructor.
The sequencer itself is non-critical, and the circuit can be built on Veroboard or similar. Make sure that C2/ C3 (Fig. 1 circuit) is nowhere near anything that gets warm or hot as that will increase leakage current. It is highly doubtful that there will ever be enough interest to warrant a PCB, so don't expect one to appear in the pricelist. While it might look complex, I expect that any reasonably competent electronics enthusiast will be able to wire up the board easily enough.
Connect the sequencer to a suitable 12V power supply with the negative side connected to earth/ground. A plug-pack type supply is ideal, and as noted you will almost certainly use a switchmode type. Leave the switch in the 'off' position, with no external trigger input. All opamp outputs should be at 10-11 volts, and the voltages at each point on the divider string should be (approximately) as shown in Fig. 1. There will be discrepancies due to the positive feedback applied around the comparators. For example, the lowest voltage is nominally 1.93V, but it will be 1.97V at 'rest' (not triggered). Provided these voltages are in the general vicinity of those shown all is well.
Switch on, and each of the opamp outputs should go to near 0V in sequence. Switch off, and all opamp outputs should return to +10-11V, again in sequence. At turn-on, as each threshold is passed, the corresponding 12V trigger output should go high (+12V) and the LED illuminate. The last output to go high will be the first to go low again.
If these tests don't give the expected voltages, check your supply voltage and wiring. Verify that each opamp has +12V on Pin.8 and zero volts on Pin.4. With no input (and Sw1 off), the voltage across C2/ C3 should be close to zero (a few millivolts at most). When Sw1 is turned on, the voltage should rise smoothly until it reaches almost +12V, and should again smoothly fall to zero when Sw1 is turned off again.

If you really want to use a PIC, I can only show a representative diagram, because I don't know which PIC you'll use or its capabilities. The principle is pretty straightforward, but the code is completely up to you. The main parts are the input interface, the PIC itself and the output switches. The code simply waits for the input pin to be pulled low, then turns on each output in turn. When the input is removed, the sequence is reversed. With an 8-pin PIC you won't have the ability to change the speed, because there are typically only 5 pins available for I/O.
The 12V is regulated down to 5.1V with the zener diode, current limited by R4 (which needs to be 1W). I've allowed for 25mA for the PIC, which will need only to provide about 2mA for each output. This allows plenty of reserve, and most PICs don't draw a great deal of current. I don't recommend that you reduce the current any further, as this is already at the lower limit. D2 protects against reversed polarity (see comments above Fig. 1 for details).
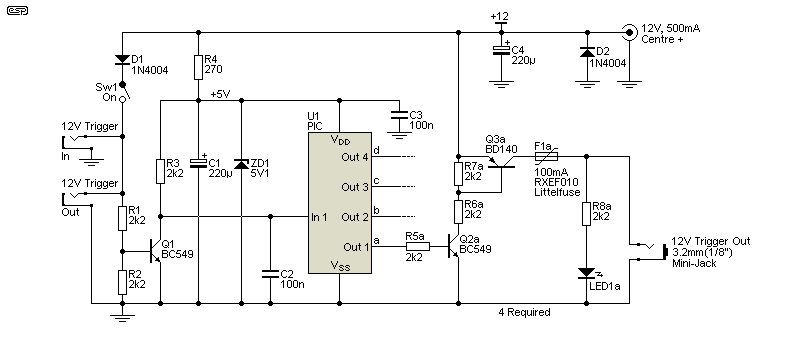
The input section is unchanged, but the transistor's collector goes to +5V instead of the +12V (via R3). The output stages need an extra transistor, because we have to translate the 5V output of the PIC to the 12V supply, which is done using Q2. I've only shown a version using the PTC fuse for protection, and only one output section is shown. Another three are needed to get the same functionality as the Fig. 1 circuit. The speed is up to you, but I'd suggest that around 1-2 seconds is the minimum I'd recommend. The code needed is also your problem - I don't propose to include even 'pseudo-code'.
As already noted, if the PIC dies and you don't have a replacement, you're out of luck and have a box of bits you can't use any more. You may be able to get an alternative PIC, which will (hopefully) have the same pinouts and be compatible with the hardware side of things. You'll then have to rewrite the code and program the replacement PIC. Not a huge problem if you do it all yourself, but a major hassle if you made it as a gift for someone ... you won't sell these, because the circuitry and principles described are copyright, and are provided for personal use only.
The circuit described in Fig. 1 and 2 will probably be all that most people will ever need. Power will be from an external supply, and no momentary mains dropout detection is provided. This keeps the circuit simple and low-cost. While there is short-circuit protection for the output transistors, sustained shorts may cause a problem. You should ensure that the unit is turned off before making connections to power amplifiers or other equipment that uses the 12V trigger. As noted, you can use Poly Switches to protect the output transistors if preferred (omitting the current limiter).
The input stage will not load any even passably sensible 12V trigger output on your installed equipment. It only draws ~5mA, and isn't fussy about the applied voltage, provided it's within the range of +5V to +25V or so. A 'though' connection (12V trigger out in Fig. 1) is optional, so using this unit can extend the number of available 12V trigger outputs to five - the device powered from the 12V trigger out socket will turn on immediately, followed by the outputs from the sequencer. Note that it will also turn off immediately, so it should be something that doesn't make any turn-on/ turn-off noise.
As noted in the introduction, this is a simplified version of the circuit described in Project 144, but reconfigured to provide standard 12V trigger outputs rather than switching the mains power. This makes it much safer for DIY, as there is no mains wiring needed. By using an external plug-in switchmode supply you avoid any mains wiring.
The PIC version is shown primarily for interest's sake, but its viability depends on the PIC you choose and your coding skills. It is simpler but less adaptable, and if you need to change the timing (for example), the PIC has to be re-programmed. You could use a PIC with more pins to allow for easy adjustment of the timing, but the code will be more complex. Of course, you could even use an Arduino or similar, but that will increase the overall cost and (IMO) would be silly for such a simple function.
 Main Index
Projects Index Main Index
Projects Index |