
|
|
| Elliott Sound Products | Project 38 |
 Main Index
Projects Index Main Index
Projects Index
|
How many times have you wished that there was a simple way to turn on that sub-woofer or some other piece of audio equipment, simply by sending it a signal? This ability is fairly common in commercial subs and some other gear, but there seems to be a complete absence of circuits on the net, and they are unavailable as an add-on device.

Please Note: An updated version of this project is described in Project 239 which address issues that some people have experienced with some Hypex amplifiers. The Mk II version is suggested anyway, because while it's superficially very similar, there are some improvements that are worthwhile.
'New Japan Radio' makes an IC that is specifically intended for the purpose (NJM2072), but you may not be able to get them where you are and there seem to be relatively few suppliers. The sensitivity of the IC is fixed at -36dBV (about 16mV) and the supply voltage is only 7V (maximum recommended). You have to use a low voltage relay coil and an external transistor, because the internal transistor current rating is not high enough to power a relay. The maximum time is also rather limited, with the maximum shown as 10 seconds - way too short for this application.
The circuit presented here will operate with a signal of 10mV (RMS), which will be adequate for all but the quietest listening. 10mV represents a typical power of about 6mW into an 8Ω speaker with a typical amplifier. That means a sound level of around 62dB SPL with typical speakers. It is possible to make it more sensitive - I tested it to 1mV, but at this level even tiny amounts of mains hum or other noise will trigger the circuit.
Using cheap and readily available parts, the unit will switch the most powerful amplifier as long as you select the correct relay. You can even use a small relay to operate a larger one, so you could switch anything you wanted to - so there are few limits.
| WARNING: This circuit requires experience with mains wiring. Do not attempt construction unless experienced and capable. Death or serious injury may result from incorrect wiring. |
The circuit shown is designed so that it will operate when power is applied. This isn't a design flaw - it's deliberate. If it didn't do it by itself, I would have added the circuitry needed to make sure that it turns on! When you connect a piece of equipment that doesn't have a mains switch (or when you first turn it on), you expect it to work, not just sit idly doing nothing. If there's no audio signal the circuit will switch off again after the time-out period. This provides a level of confidence that everything is functional without having to connect an audio lead.
Please Note: This circuit is designed for use with conventional electromechanical relays. It MUST NOT be used with a solid state relay (SSR) because the MOSFET switching time is slow, and this will cause problems and possible damage to the SSR and/or the following circuitry. An electromechanical relay will hold in until the current falls to a low value, and will release at close to normal speed once the release threshold has been reached. Since the circuit (subwoofer amp for example) will be idle because there is no signal, the relay will easily break the small residual current and power down the controlled circuit.
There is also an option to use the circuit as a sound activated switch. By using an electret microphone capsule at the input, the circuit will detect noise above a preset threshold and turn on the relay. This can be used to turn on a light, activate a video recorder, or anything else you wish.
The switch detector unit is shown in Figure 1, and uses an LM358 dual opamp, and a handful of other parts. The relay switching device is a MOSFET, selected because of the almost infinite input resistance. The 2N7000 shown is recommended because it has a threshold voltage of less than 3V and is fairly cheap, but virtually any MOSFET will work just as well, even if the gate threshold is a little higher. Alternatives are BS170, BS270, VN2222, etc. An MTP3055 can also be used, as shown originally in this circuit. Note that if the MOSFET's gate threshold voltage is too low, it may remain on permanently. Use two diodes in series in place of D6 to add an additional 0.65V. The opamp should be an LM358 (or similar) as shown. While you can use various others, the outputs of most common opamps cannot reach zero volts - the worst case minimum is about 2V. The LM358 is recommended because its output voltage does go to zero volts.
The circuit uses a reference voltage line (R8, D5 and C3, nominally +5.1V) to bias the opamp inputs and provide a comparator reference voltage. Since the same supply is used for both, regulation is not required as any variation will be applied both to opamp input and comparator, so the two will track properly over a wide voltage range. Voltages shown are typical - they could vary depending on the actual supply voltage. 12V and 5.1V as shown are nominal, and may be slightly different.
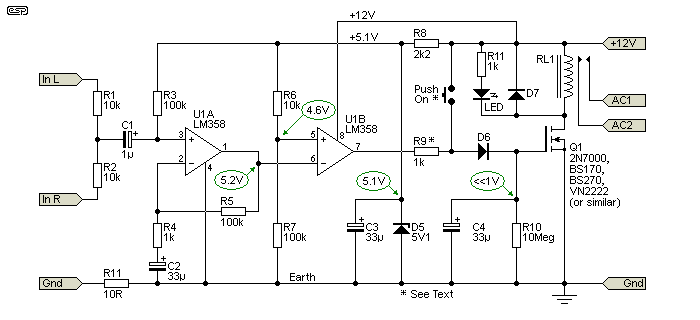
Figure 1 - Audio Detector And Switching Circuit
A signal feed is taken from both Left and Right channels via R1 and R2 (leave out one input resistor for a mono source such as a sub-woofer). This is amplified by 100 by U1A, and the output is supplied to the comparator U1B. When the amplified signal exceeds the comparator threshold of about 0.5V below the reference level (~4.6V), the output of U1B goes high momentarily, and starts charging C4. After a few cycles, Q1 turns on and energises the relay. Verify that the voltage at the output of U1A (pin 1) is more positive than the voltage at the non-inverting input of U1B (pin 5).
The 'Push-On' switch is optional, as is the LED and its resistor (R11). While not repeated on the Fig. 5 circuit, either or both can be added to that as well.
There have been reports of the circuit re-triggering with some Hypex amplifiers. This is almost certainly due to a transient from the amplifier causing the circuit to re-trigger. R9 is intended to slow down the reaction time, and with 1k as shown, the signal has to be present for about 250ms before the circuit will trigger. If this isn't enough to prevent problems, increase the value of R9. You can increase it to about 10k if necessary. This will delay the remote amp turn-on, hopefully enough to solve the problem.
Should it be found that the circuit is too sensitive, increase the value of R6 - this makes the comparator less sensitive, so more signal will be needed. Likewise, to increase sensitivity reduce the value of R6 - use a 20k trimpot for a useful sensitivity range. The comparator is triggered by negative transitions from U1A, so the output of U1A has to fall below 5.2V for the comparator to produce a high output. Make sure that the voltage at the MOSFET gate is no more than perhaps 100-200mV or so when the output is supposed to be off. If the MOSFET turns on even very slightly, the relay may not release after the timeout. Note that the value of R9 has been increased. It was originally 100Ω, but that makes the detection very fast. Using 1k means that signal has to be present for ~35ms before the relay is activated. That's still fast, and you can make R9 larger if preferred (no more than 10k though - about 350ms).
Note that the above circuit is intended for signal levels, NOT speaker level. If the signal to be switched is speaker level, it must first be attenuated so that even at full power, no more than about 2 Volts is applied to the circuit inputs. High signal levels may destroy the input circuit of the opamp. See Figure 4 for a modified version of the input stage for speaker level signals.
After the audio signal is removed, it will take some time for C4 to discharge through R10, and after about 5½ minutes Q1 will switch off again, and disconnect power from the amplifier. The time can be varied by changing either C4 or R10 - increase either to make the time longer or vice versa. Note that even small amounts of leakage on a circuit board may reduce the time delay, so the junction of the gate of Q1, anode of D6, C4 and R10 can be 'skyhooked', or suspended in mid-air. Because C4 will most likely be an electrolytic type, make sure that you use a low leakage part or the delay time might be much shorter than expected. Don't use a tantalum caps in the circuit, as they are the most unreliable caps ever produced, and I never recommend them for anything.
The diodes can be 1N4148 or 1N4004 types, whichever is the easiest to find (or is already at hand). They are not critical, so other types will be just as suitable (I shall leave this to the reader).
When I tested the circuit, I tried a 100nF cap to the gate (instead of 33µF), and no discharge resistor. I got tired of waiting for the relay to release, so it is possible to get very long (but unpredictable) times even with small capacitance values. As noted above, the gate voltage must fall to less than 1V - ideally zero. Be careful, because even a tiny leakage current from the supply to the gate circuit may prevent the circuit from turning off the relay. The impedance is very high, and that's why I suggested using the 'skyhook' approach above. Fortunately, most electrolytic capacitors have some leakage, so C4 will discharge itself ... eventually.
If this unit is to be used to power existing equipment and will be in its own case, use the input circuit shown in Figure 2 to allow the signal to pass through the switching unit. There are no electronics in the signal path, so the signal will not be impaired. The 10k input resistors may introduce some crosstalk if the drive amp has high output impedance, but this is unlikely to cause a problem with the majority of preamps. If you have a valve preamp with an output impedance of more than 1kΩ, you might want to use only one input and leave the other disconnected.
An alternative is to increase the value of the resistors (R1 and R2), but bear in mind that this will reduce the system's sensitivity. It might be necessary to increase the gain of U1A (reduce R4) to compensate, as well as install a 20k trimpot in place of R6 (Figure 1) to allow you to set the sensitivity.

Figure 2 - Pass Through Input Circuit
Note: The point marked 'C1' on this circuit connects to C1 in Figure 1. R1 and R2 in this diagram are the same as in Figure 1 and not an addition.
The power supply for this circuit must be on permanently (predictably), so I suggest that a quality transformer be used to prevent the possibility of fire or other failure. This point cannot be overlooked, as a cheap tranny may not have the build quality of a good one and may pose a genuine hazard. A transformer with an integral thermal fuse provides added peace of mind.
Having said this, the supply is very simple. It does not need to be regulated, and the detector will work quite happily from 9 to 15 Volts. A plug-pack ('wall-wart') supply is quite suitable (including switchmode types), and most of these are well protected against internal failure. Since it expected that a 12V relay (coil voltage) will be the most commonly available, I suggest a supply of 12V. The relay must have contacts rated at the full mains voltage (240 or 110 V AC, as appropriate), and with sufficient current rating to suit the amplifier being powered. Typically a 5 or 10A relay will be more than sufficient, but bear in mind that some large power amps draw a massive current when switched on, so make sure that the relay is capable of high surge current (most are, but if you are not sure, ask your parts dealer for advice).
The bridge rectifier shown can be made using 1N4004 diodes, as the current is low and standard diodes will be quite satisfactory. A 1A bridge rectifier will be more than sufficient to power the circuit.

Figure 3 - Power Supply And Mains Switching
All mains wiring must be done using approved mains cable (do not use normal hook-up wire), and any exposed terminals must be securely shrouded using heatshrink tubing or similar. Do not use insulation tape, as this has a tendency to come undone and leaves sticky stuff all over everything. Use an approved mains outlet if the unit is to be used as a peripheral device to existing equipment. In this case, see Figure 2 for pass through connector wiring.
Make sure that mains wiring is properly separated from input wiring and other low voltage wiring. The relay must be mounted securely, and well away from the signal input wiring. The terminal marked 'A' is the active/ live/ hot mains lead, and as seen goes to the transformer (via the fuse) and to the normally open switching contacts on the relay. The neutral lead is connected to the transformer, and to the outlet (lower three connections on the left of the diagram). The earth (ground) must be connected to prevent electric shock, and is connected to the chassis (assuming a metal case). If a plastic case is used, the earth should be connected to the mounting bracket of the transformer (assuming a 'open frame' type).
The secondary circuitry (after the transformer) does not need to be connected to earth, however it is far safer to do so. The 10Ω resistor (R11 in Figure 1) is designed to prevent any earth loop hum, so connecting the secondary circuitry to mains earth will not cause a problem with hum or other noise.
The other alternative is to use a good quality switchmode supply, typically in the 'wall transformer' style. These are readily available from most electronics outlets, but steer clear of any that don't have genuine approvals from the appropriate regulatory agency where you live - e.g. CE, UL, FCC, CSA, Veda, AS (and C-Tick), etc. A certain auction site has plenty on offer, but many are not approved (despite the claims made) and some are positively dangerous. The output needs to be 12V DC, at a current of 100mA or more. Since it will be on permanently, choose one that has a very low idle power (less than 1W).
If the unit is to be operated by detecting speaker level signals, some changes are needed to the front-end circuitry. The level must be reduced, and protection is needed for the opamp input, otherwise the high signal level would damage the opamp. Figure 4 shows the needed changes.
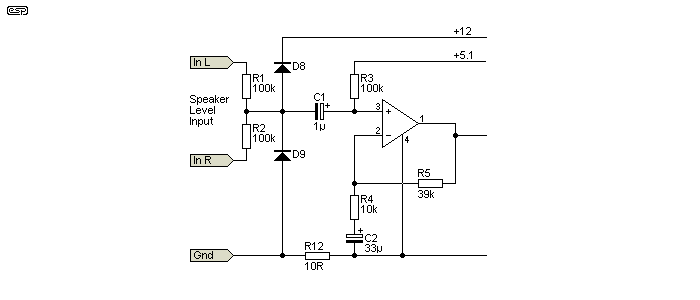
Figure 4 - Input Circuit For Speaker Input
The diodes prevent high level signals from causing damage, and the signal is attenuated and current limited by using 100k input resistors. The opamp is run with a gain of five - increase the value of R5 to increase the gain if needed. Diodes are 1N4148 or 1N4004. With the circuit set up as shown, a speaker level of about 200mV on each speaker line (equivalent to 5mW into an 8Ω speaker) will trigger the circuit.
The supply connections are as shown, and the opamp output goes directly to pin 6 of U1 as before.
There are a few applications where a sound powered switch is required. This might be to turn on a light when sound is detected, which may be more convenient than using a passive IR (infra-red) or microwave motion detector. There have been 'gimmick' products over the years that turn lights on and off based on hand claps, but this is not feasible with the circuit shown. This is intended purely to turn on a light (or anything else) when noise is detected above the threshold.
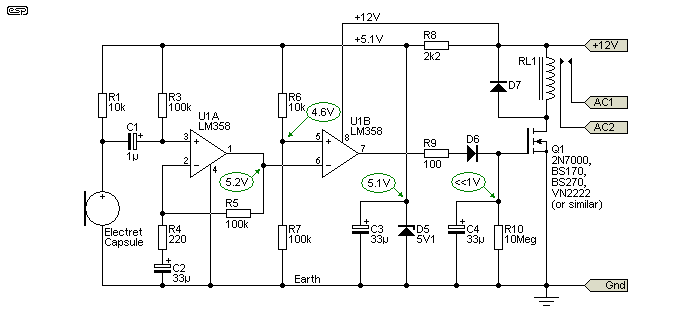
Figure 5 - Sound Activated Switch
It's basically identical to Figure 1, but adds an electret microphone to the front end and R9 is reduced 100Ω. Because the level from the mic is likely to be very low, the input gain may need to be increased even further. With the values shown, the gain of the first stage is around 53dB, but this can be changed by varying R4. A higher value reduces gain and vice versa. Frequency response is centred around 230Hz with the maximum available gain between 50Hz and 1kHz. Reduce the value of C2 to reduce low frequency response. The upper frequency response is very limited, due to the opamp. If gain is increased, the HF response will not change because the opamp will run out of gain at anything above 1kHz. You can use a faster opamp if you need extended response. Make sure that the opamp used can pull its outputs to close to zero volts, or the MOSFET may not turn off when driven from the second half of the IC.
If desired, R7 can be a 100k trimpot, so the level can be adjusted to suit your needs. With less resistance, the sensitivity is reduced.
The Figure 5 circuit can also be used for muting, where connected circuits make rude noises at power-on or power-off (provided the latter is delayed by at least a few seconds). The input will come from the audio feed rather than a microphone, and the relay will be used to switch the audio, not mains. R9 will need to be increased to prevent the relay from closing while the switch-on noise/ pulse is still present. A starting value of 10k means that audio has to be present for about 300ms before the relay closes. In most cases, you won't need the long delay provided by R10, and it can be reduced. At 100k, the delay is about 3.3 seconds. This is for experimenters, but it's a good start if you need a signal-detecting mute circuit.
| Main Index
Projects Index
|